2条评论
收藏
EMLOG前台AJAX登陆
最近把EMLOG学院的主题改了一下,此次小改包括收费模板列表页面以及收费模板详细页面。
然后是文章阅读页面,因为把多说给卡擦了换成了内核评论,所以采用了有附件的文章需要登录才能下载。
做法也就是在文章页面判断一下是否是作者或者管理员,如果是作者则可以下载,否则需要登录。
这里主要是说登录页面,因为如果是游客的话肯定要登录才能下载,常见的方法是一个超链接到登录页面。
但是这样感觉有点小不爽,还要经过页面跳转,登陆后页面还要刷新,严重影响体验,所以准备用ajax提交。
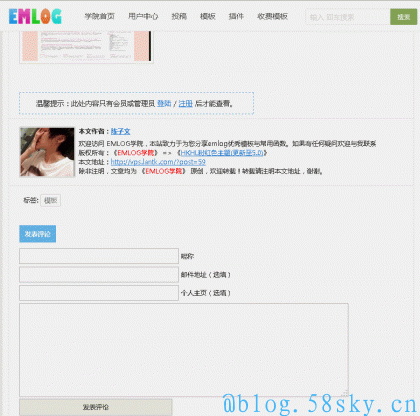
经过测试已经没有什么问题了,把代码分享给各位喜欢折腾的emer们,动态效果图:
echo_list文章阅读页代码
<?php if(ROLE == 'admin' or ROLE == 'writer'): ?>

<div class="1">您已登录</div>

<?php else: ?>

<script type="text/javascript">
   function toggle(divid){
    var odiv = document.getElementById(divid);
    odiv.style.display=(odiv.style.display=="block")?"none":"block";
    }
    $(document).ready(function(){
    $('#send_ajax').click(function (){
    var username = $('#input1').val();
    var age = $('#input2').val();
    if (username == '') {
       $('#contentdiv_a').html('<font color="red">帐号不能为空</font>');
       return false;
     }
    if (age == '') {
       $('#contentdiv_a').html('<font color="red">密码不能为空</font>');
       return false;
    }
    var params = $('#formtest').serialize(); //序列化表单的值

    $.ajax({
       url:'content/templates/ELMOG_D7/ajax_login.php', //后台处理程序
       type:'post',       //数据传送方式
       dataType:'json',   //接受数据格式
       data:params,       //要传送的数据
       success:update_page//回传函数(这里是函数名字)
       });
      });
     });
    function update_page(json) { //回传函数实体,参数为XMLhttpRequest.responseText

       var str1=json.yes_return;

       if(str1=='0'){
            alert("登录成功");
            var url = window.location.href;
            location.href=url;
        }else if(str1=='1'){
            $('#contentdiv_a').html('<font color="red">用户名或密码或验证码输入错误!</font>');
        }else if(str1=='2'){
            $('#contentdiv_a').html('<font color="red">账号或密码错误</font>');
        }else{
            alert("非法登陆");
        }

     }
</script>

<span class="login">温馨提示:此处内容只有会员或管理员 <div class="titlediv" onClick="toggle('divContetn1')">登陆</div> / <a target="_blank" href="<?php echo BLOG_URL; ?>?post=<?php echo _g('login_reg'); ?>&action=reg">注册</a> 后才能查看。</span>

<style>
.contentdiv{display: none;}
.titlediv {cursor: move;display: inline-block;color: #3b8dd1;}
#divContetn1 li {list-style: none;}
.contentdiv {border: 1px dashed #61b3e6;margin-top: 20px;height: 90px;}
.contentdiv_left {float: left;width: 40%;}
.contentdiv_right {float: left;padding: 10px;width: 20%;}
.submitBtn {width: 100px;height: 30px;margin-top: 15px;}
</style>

<div class="contentdiv" id="divContetn1">
    <div class="contentdiv_left">
        <form id="formtest" action="" method="post">
            <ul class="editInfos">
            <li><label><font color="#ff0000">* </font>账号:<input id="input1" type="text" name="user" required value="" class="ipt" /></label></li>
            <input style="display: none;" type="checkbox" name="ispersis" id="ispersis" value="1" />
            <li><label><font color="#ff0000">* </font>密码:<input id="input2" type="password" name="pw" required value="" class="ipt" /></label></li>
            </ul>
        </form>
    </div>
    <div class="contentdiv_right">
        <input type="submit" name="send_ajax" id="send_ajax" value="确认" class="submitBtn" />
    </div>
    <div id="contentdiv_a"></div>
</div>
<?php endif; ?>
AJAX后台程序
<?php
/**
* ajax异步提交登录验证模块
*/
require_once '../../../init.php';
?>
<?php
$data3 = $_POST;
if(!empty($_POST)){
$username = isset($_POST['user']) ? addslashes(trim($_POST['user'])) : '';
$password = isset($_POST['pw']) ? addslashes(trim($_POST['pw'])) : '';
$ispersis = isset($_POST['ispersis']) ? intval($_POST['ispersis']) : false;
$img_code = Option::get('login_code') == 'y' && isset($_POST['imgcode']) ? addslashes(trim(strtoupper($_POST['imgcode']))) : '';
if (LoginAuth::checkUser($username, $password, $img_code) === true) {
LoginAuth::setAuthCookie($username, $ispersis);
//emDirect("./");
$loginbug='0';
// emMsg('登录成功!',BLOG_URL.'?plugin=blog_ml',true);
//emMsg('登录成功!','/',true);
}else{
if(Option::get('login_code') == 'y'){
$loginbug = '1';
}else{
$loginbug = '2';
}
}
}
$ckcode = Option::get('login_code') == 'y'?'验证码:<input name="imgcode" id="imgcode" type="text" />
<img src="'.BLOG_URL.'include/lib/checkcode.php" id="code"/> * ':'';
$arr = array (
'yes_return'=>$loginbug
);
print json_encode($arr);
?>
注意事项
1.echo_list.php中的“//后台处理程序地址”需要改成你自己的即可。如有疑问可以留言。
2.ajax模块如果不是很会的最好不要动,以免报错,直接放到模板目录即可
本文转自《EMLOG学院》
版权声明:若无特殊注明,本文皆为《Finally》原创,转载请保留文章出处。
本文链接:EMLOG前台AJAX登陆 - https://emlog.jiaozi.pro/em_ajax_dl.html


 支付宝扫一扫
 微信扫一扫
微信扫一扫 企鹅扫一扫
企鹅扫一扫


![[Fly]Emlog响应式全站Pjax主题 [Fly]Emlog响应式全站Pjax主题](https://emlog.jiaozi.pro/content/uploadfile/201702/ccdb1486252452.jpg)


评论:2条评论